$E36868(%Y%m%d)_$E36868(%H%M%
Wednesday, December 24, 2014
irfanview: rename file names in batch processing
Renaming camera photos in
terminator: windows size and position
Example of a confing file:
[keybindings]
[profiles]
[[default]]
use_system_font = False
font = Monospace 12
background_image = None
[layouts]
[[default]]
[[[child1]]]
profile = default
type = Terminal
parent = window0
[[[window0]]]
type = Window
parent = ""
position = 1110:1043
size = 1300, 450
[plugins]
~/.config/terminator/config
[keybindings]
[profiles]
[[default]]
use_system_font = False
font = Monospace 12
background_image = None
[layouts]
[[default]]
[[[child1]]]
profile = default
type = Terminal
parent = window0
[[[window0]]]
type = Window
parent = ""
position = 1110:1043
size = 1300, 450
[plugins]
Wednesday, November 05, 2014
Ubuntu: pdf to images and images to pdf
pdftoppm -png a_pdf_file.pdf img

convert *.png a_pdf_file_as_img.pdf
Tuesday, November 04, 2014
Git pretty tree alias
git config --global alias.tree "log --graph --full-history --all --color --pretty=format:\"%x1b[31m%h%x09%x1b[32m%d%x1b[0m%x20%s\""
Tuesday, September 23, 2014
Thursday, September 04, 2014
Firefox OS MultiROM build from 4th September 2014 for Nexus 5
Following this guide, I built the current (4th September 2014) Firefox OS from git repositories for Nexus 5 for MultiROM. The guide explains how to build it, make MultiROM and how to install it on Nexus 5. The problem is that it contains build rom from June 2014. So I decided to build the current one from September 2014
The Firefox_OS_2014_09_04.zip rom for MultiRom can be downloaded from here.


USE AT OWN RISK!
I don't assume any responsibility for damage caused to your device or lost data.
The Firefox_OS_2014_09_04.zip rom for MultiRom can be downloaded from here.
Monday, August 04, 2014
ImageMagick: resize images to specific width or hight
For example to resize tif images to width of 512 pixels:
Whereas to resize tif images to height of 512 pixels:
mogrify -resize 512 *.tifWhereas to resize tif images to height of 512 pixels:
mogrify -resize x512 *.tifTuesday, July 29, 2014
Git: Show updated tree of branches in console
To do this, just add the following to ~/.gitconfig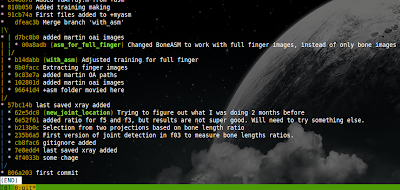
To run git tree in console showing e.g. 20 latest commits we can run git tree in a while loop as follows:
[alias]
  tree = log --graph --all --decorate --pretty=oneline --abbrev-commit
Then git tree will give text based tree of branches:

To run git tree in console showing e.g. 20 latest commits we can run git tree in a while loop as follows:
while true; do clear; git tree -20; sleep 2; done
Wednesday, July 23, 2014
Gnome 3.12: Add VirtualBox machine to gnome's activities and dash
Specific virtual machines can be launched directly from gnome activities or gnome dash without the need to start standard Virtual Box GUI. For this we need to create desktop files and place them in our local applications folder, i.e., /.local/share/applications.
Example of a desktop file starting virtual machine called w7 is as follows (file name w7.desktop) These files can be created manually, but also using Virtual Box GUI. Once we have these files, it is enough just to copy them into /.local/share/applications and they will be e immediately available in the gnomes activities. From the we can just drop and drag them to dash. If we want to create them manually, we can use the example from the above. The ids of the virtual machines can be obtained using the following
Example of a desktop file starting virtual machine called w7 is as follows (file name w7.desktop) These files can be created manually, but also using Virtual Box GUI. Once we have these files, it is enough just to copy them into /.local/share/applications and they will be e immediately available in the gnomes activities. From the we can just drop and drag them to dash.

 vboxmanage list vms

"w7" {25e911a6-7bae-422a-84c2-30ced68d701d}
Tuesday, July 22, 2014
Gnome 3.12: Auto start applications with a delay
In gnome, applications can be start by copying *.desktop files into ~/.config/autostart.
The installed desktop files of your applications are in /usr/share/applications and in ~/.local/share/applications. Thus you can copy files from there into ~/.config/autostart and modify to your liking.
Off course, you can also create your own desktop files for running, or starting applications with a delay. For example, I made the desktop file called myautostart.desktop in ~/.config/autostart
As can be seen the file starts ~/.mystartups.sh which has the following contents:
The file launches terminator and chromium using desktop files with 2 and 1 second delays.
The installed desktop files of your applications are in /usr/share/applications and in ~/.local/share/applications. Thus you can copy files from there into ~/.config/autostart and modify to your liking.
Off course, you can also create your own desktop files for running, or starting applications with a delay. For example, I made the desktop file called myautostart.desktop in ~/.config/autostart
[Desktop Entry]

Type=Application

Name=MyStartup

Comment=Starts my applications

Exec=/bin/bash /home/put-your-user-name/.mystartups.sh

X-GNOME-Autostart-enabled=true

Hidden=false

NoDisplay=false
As can be seen the file starts ~/.mystartups.sh which has the following contents:
#!/bin/bash

sleep 2

exo-open /usr/share/applications/terminator.desktop

sleep 1

exo-open /usr/share/applications/chromium.desktop
The file launches terminator and chromium using desktop files with 2 and 1 second delays.
Sunday, July 20, 2014
Ubuntu: Fix ntfs parition on usb drive
If there are problems with mounting usb thumb drive (in my case the usb is /dev/sdc1), one can use this:
sudo ntfsfix /dev/sdc1
Saturday, July 12, 2014
Capture desktop using ffmpeg and re-size the resulting video.
The following command can be used to record your display and the compress the resulting image
ffmpeg -f x11grab -video_size 2560x1440 -i $DISPLAY -f alsa -i default -c:v ffvhuff -c:a flac test.mkv


ffmpeg -i test.mkv -vcodec libx264 -preset ultrafast -qp 0 -acodec copy -vf scale=-1:720 output.mkv
Thursday, July 03, 2014
How to install virtual environment of Python 3.4.x from source in Ubuntu 14.04
Below is a recipe that I use to used to install and set-up virtual environment of Python 3.4.x in Ubuntu 14.04 x64.
Thursday, June 26, 2014
Reading DICOM files in Python 3
In Python 3, dicom files can be read, analysied and processed using Wand which is Python binding for ImageMagic. The example below shows how to get medical and image date embedded in DICOM and also how to disply the image itself.
Python 3.4 and Pillow 2.4 with JPEG2000 (openjpeg 2) support in Ubuntu 14.04
Pillow support for JPEG2000 comes from openjpeg 2 library. Unfortunatly, Ubuntu's libopenjpeg2 package is not version 2 of the openjpeg library, but actually version 1.3 which wont work with Pillow.
Installing Pillow 2.4 (pip install -I pillow) simply results in "OPENJPEG (JPEG2000) support not available".
Thus, it is needed to compile the openjpeg library 2.0 from source. For this, first lets download the openjpeg 2.0.1:
Please note that we install version of openjpeg 2.0, rather than newer 2.1. Pillow wont recognize openjpeg 2.1 either.
Assuming everything went fine, we can reinstall Pillow:
If openjpeg 2.0.1 was detected successfully, we should get the following info "OPENJPEG (JPEG2000) support available" among others.

Installing Pillow 2.4 (pip install -I pillow) simply results in "OPENJPEG (JPEG2000) support not available".
Thus, it is needed to compile the openjpeg library 2.0 from source. For this, first lets download the openjpeg 2.0.1:
wget http://downloads.sourceforge.net/project/openjpeg.mirror/2.0.1/openjpeg-2.0.1.tar.gz


tar xzvf openjpeg-2.0.1.tar.gz


cd openjpeg-2.0.1/


cmake .


make


sudo make install
Please note that we install version of openjpeg 2.0, rather than newer 2.1. Pillow wont recognize openjpeg 2.1 either.
Assuming everything went fine, we can reinstall Pillow:
pip install -I pillowIf openjpeg 2.0.1 was detected successfully, we should get the following info "OPENJPEG (JPEG2000) support available" among others.

Wednesday, June 18, 2014
DICOM (dcm) files wont upload to Wordpress
Uploading DICOM files (*.dcm) files into Wordpress, may not work. For example using Visual Form Builder plugin for file upload, wont upload DICOM's. This is because wordpress and/or file upload plugins use wp_get_mime_types() function from wp-includes/functions.php to check mime type of the file being upload. Unfortunatly, dicom is not there. Thus it need to be added. To do this, just add 'dcm' => 'application/dicom', into wp_get_mime_types(). For example, as shown below:

Thursday, June 12, 2014
Xubuntu: Take screenshot of current window only
Pressing Prt Sc button on the keyboard takes screenshot of the entire desktop. To take the screenshot of the selected/current window only, we can use Alt + Prt Sc
Tuesday, June 10, 2014
ImageMagick: get size and resolution (DPI) of images
To get size and resolution in DPI of many images at once using ImageMagick, we can use this command:
identify -format "%w x %h %x x %y\n" *.tiff This result for example in:576 x 432 72 PixelsPerInch x 72 PixelsPerInch
576 x 432 72 PixelsPerInch x 72 PixelsPerInch
576 x 432 72 PixelsPerInch x 72 PixelsPerInch
576 x 432 72 PixelsPerInch x 72 PixelsPerInch
576 x 432 72 PixelsPerInch x 72 PixelsPerInch
576 x 432 72 PixelsPerInch x 72 PixelsPerInch
Friday, June 06, 2014
Python 3.4: Check if module installed
To check whether a given module is install in Python 3.4, we can use PathFinder.find_spec class method. For example, to check if pyperclip moduel is installed / available we can use the following code:
Wednesday, May 28, 2014
Google: search for websites containing exactly the given word or pharase
To search for websites containing exactly the given word or phrase, one can use allintext: operator. For example:
allintext:"some phrase"
Friday, May 23, 2014
Python 3 and tkinter: scroll canvas with mouse wheel and drag it around with middle mouse button
This is an example in Python 3.4 running in 64-bit Ubuntu 14.04 of a canvas that can be scrolled with mouse wheel and dragged around with middle mouse button. Hope this example will be useful to you.


Subscribe to:
Comments (Atom)